CLICK HERE FOR FREE BLOGGER TEMPLATES, LINK BUTTONS AND MORE! »

Monday, May 31

Mr and Mrs Bakk-

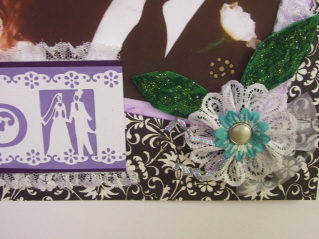
Here is my take for this weeks sketch #106 at Creative Scrappers, which I love working with their sketches- I look forward to them every week. This is a wedding photo of my husband and I in our backyard wedding in 2000. My colors were teal and purple,black and white so all the pages I'm doing right now are in that color scheme.
Materials used in this layout are: K&Company designer papers,black Zig pen for journaling, 3-D emboss glaze pen in black, silver gel pen, embossed paper flowers chalked a bit in lilac and doodled with black pen, black and silver brads, and black stickles. I also did a zig-zag stitch around the border of layout

SOAK-N-WET

Here was a fun and goofy looking photo of my Eskie "Jenna" who loves to play in the water from the hose last summer. She is a bundle of fun and fur, but here she looks like a drowned rat. I'm entering this layout over at Practical Scrappers this week for using acrylic, vellum or transparencies. I used acetate and hand drew the title on and the blue water spouts. I then painted the backs in white and blue acrylic paints and cut it out to size and used pop dots to attach to the page.
I also was choosen as one of the top 3 this week for this layout. I had a fun time doing this page of my little eskie.

LOVE- wedding layout

Here is a layout of I and my DH on our wedding day with a picture of his mom and my mom. I liked how this turned out, I wasn't to happy with it when I first started laying it out. I'm trying to do all my wedding photos using the colors teal, purple and black and white.This wil be entered over at My Little Sketch Blook with Liz, she has the most beautiful page sketches. Materials used: K&Company designer papers, teal cardstock and purple polka dot ribbon, black ink, rhinestones, heart punch, stickles"diamond", black journal pen by Zig, and fiskar decorative edge scissors, a 2 sizes of a scalloped punch,  cartridge by cricut- Home Accents for the title LOVE layered.

I do-wish this ring-kiss

This is my layout titled" I Do-with this Ring-you may Kiss the bride" I  love working with the sketches over at Practical Scrappers every Friday. I have so many photos of our wedding put don't want to scrap all of them so these 3 kinda tell the story of the ceremony on one page of our vows. Materials used in layout include: Misc papres in stock in my colors teal and purple,heart punch, fiskars embossing template"hearts" black & teal ink, stamps from a valentine set, 3-d emboss glaze gel pen in blackand pink,

Here comes the Bride

Here is my take on the sketch from Sketchy Thursdays...I used song musical paper for background and teal cardstock behind that and did the title in purple to brign out all the colors I had in the wedding, I tied some bows made from a white satin ribbon and some glitter ribbon in teal and purple also. I attached several white and lavendar premade silk flowers on the layout. I then wrote with a black gel pen all around the edges of this layout. I used Lyrical Letters for the title.

All in the Family

This is my take on Sketch #2 for LID Challenge this week and I love how this one turned out, wasn't sure about the stripes in the background -but they seem to work out ok. I made the flowers using  Accent Essentials cart. to cut out several floral shapes from old dictionary book and inked the edges a bit and attached with a brad. I had drew some swirls with leaves in a green glitter pen. Other products used in layout include: sticker rhinestones, K&Company designer papers,fiskars paper edger"victorian",  diamond stickles  and a 3-D emboss black gel pen for writing.

Song, Poem and Music

This is my take at LID Challenge sketch #1 and also for Frosted Designs to use the picture for inspiration with the colors of purple, blue and lime green, and since those were some of my colors in my wedding this worked out well for me since I'm doing alot of Wedding photos right now.  Products used in this layout included. TPC Studio papers,deep purple cardstock, scrap paper for mat, Zing leaf green embossing powder, heat gun, versa mark clear ink, purple ink, fiskars corner punch, white & black gel pen, purple stickles & glitter pen, white heart ribbon and used Lyrical Letters to cut out the titles.

Friday, May 28

Frugal Fridays - week #4

Welcome to Frugal Fridays...this week I was doing some more organizing in my craft room when I found these old stencils and thought...Hmmm- I could put these to use again ,when I'm scrapbooking/cardmaking. You can use your sprays, chalks, paints or trace with gel pens or markers. Use all of the stencil for a background on your page or just part of the stencil for an embellishment, or border. I really like the ivy stencil, which I bought years and years ago (was very popular back in the days) to do my patio porch and some terra cotta pots. Now this would be great for making some of my own patterned cardstock. I also keep the backings of some of the sticky chipboard letters-they make great stencils for masking or paint them or not and use on your layouts. So your getting more than just one use out of your chipboard letters. I keep a little 3 drawer organizer on my work table to keep all these little misc letters and items in for handy use. Enjoy the nice weather and have a great Memorial Weekend.

Thursday, May 27

My Little Sketch Blook Challenge

Here is my take of the Sketch from My Little Sketch Blook..which Liz has wonderful sketches ,so this is my first try and I really enjoy doing this page. I found individual design papers from my large stash that had the colors of our wedding lilac and teal, and black & white.I used the cricut cartridges -FMK for the Toast , blend tags, rolls & silverware, SYI for champagne glasses, GF for Mr. & Mrs. I made my own flowers by punching out 3 different floral shapes from an old print book and inked them in 4 colors-lilac, purple, pink, and teal attached them with a pewter heart brads. I drew on leaves with glitter jelly roll green pen and added  diamond white stickles to Mr & Mrs and champagne glasses. Also with black ink stamped a leaf border to left side of page and a love border around the photo. This is a photo from our backyard wedding/reception in 2000( both on our 2nd marriage) we had over 150 people attend which started out to be a small group of family and friends about 25.It was such a wonderful day and great memories and fun times to be had by all.

Creative Scrappers Challenge- (sketch #105)

This is my layout for Creative Scrappers Challenge Sketch #105 and its is a picture of our mothers on the day we got married in 2000, and I love the way it turned out. I used a design purple flower paper for background and used scrap papers for the others. I added a vellum saying to the right side of page and stamped swirls in black ink and added a gold glitter glue.Also stamped in black staz-on butterflies on a patterned cream paper and cut them out and attached to page. Other embellishments include a Love chipboard with gold brads, letter M chipboard with lilac ribbon tied on, a key stamped on ivory paper, and a pre-made butterfly tag and used a small mom stamp for the photo border. I also inked all the edges in brown or black ink.

Practical Scrappers-felt-tulle-etc/ FCCB #11

 This is our Wedding in 9/2000 which will be the first 2 pages in my Wedding Album scrapbook. On these two pages I made my own flowers with lace ribbon, tulle and silk flowers with pearl brads and some rhinestone brads and some wire ribbon curled attached to middle of the 3 larger flowers. I also made the leaves with  cut felt covered with a dark green ribbon lace and spinkled lime green glitter on them. I used a heart lace as borders on each side of photos, ink the edges (lilac) of the invitation and lilac cardstock  and used K&Company black and white papers. The cartridges I used were Gypsy Font for the initails K&D, Stretch your Imagination for the bride and groom tag on page 2 and then used Martha Stewart floral border punch.

Sunday, May 23

Paper Poppy Kit Sketch /Sketchy Thursdays due 5/26

Here is my take on the Paper Poppy Kit sketch & Sketchy Thursdays this week, this is my first entry in the Sketchy Thursdays- which I stumbled upon thier blog the other day. The picture didn't turn out so great due to the light colors I used. I used 3 papers from Me &My Big Ideas pack. I inked the edges with coffee bean brown and cut the flowers from the paper and attached them in several areas of the layout. I cut strips of the green polka dot paper to journal on and attahed gold brads to the left sides of strips, also added a blue metal bracket on the left side with the date written in the middle. The title is done with brown stickers.These pictures are of my daughter at my wedding reception in Sept. 2000, that we celebrated in our home

FCCB #10

This is my project for the FCCB #10 challenge this week to do a 3-D project- box or bag -etc and to use the color black and of course some where use a cricut cut on your project. Well this worked out great for me this week because my son's girlfriend is graduating from H.S. on Sunday, so I made this  Graduation Cap box to give her with a small cap card inside with a gift card. I bought the cap box for $1.99 at a card outlet store and painted it black and put a glossy spray on it.
Let it dry leaving the inside white. I then used my Gypsy to plan out all the words and numbers for the outside of box. I used Wild Card for Class of 2010, Diploma, Stars, You did it!- Gypsy Wanderings for Congrats!. I made my own tassle using a thick braided thread and a silver gel pen to write her name on the little graduation cap card, which I cut 2 caps one in black and one in white ,so I could write on the inside- using Wild Card cartridge.
I attached all the words and letters using a spray adhesive. Their school colors are of course as you can see, are black ,white and maroon. Last I tied on the tassle and its ready to go for tomarrow's Graduation. She will be able to use it as a cute little trinket box on just put on display.

Practical Scrappers Sketch by 5/28

Here is my layout this week for the Practical Scrappers Sketch challenge. I used a dark purple cardstock and DCWV designer paper from Far East stack and sanded the edges. Other items used were a scalloped punch , 2 sizes in a circle punch,buttons, cream embroidery floss,3-D black glaze pen, lilac & black ink,and some scrap paper for the 2 strips in the middle of layout and the 5 flags, and scrap cardstock to mat the pictures.

Friday, May 21

Frugal Fridays - week #3 Adhesives

 Well can't wait to tell you about YES paste. I have had alot of scrappers asking me about this adhesive in the past two weeks cause they have seen it  as one of my give-aways in my blog candy, and say they have never heard of it. Well here it is, I have been using this for over 1 1/2 years now and love it. It comes a 1 pint jar for $10.99 (Michaels) but get it for $7.08 with  your 40% off coupon, its 100% acid free- won't wrinkle, non-toxic- waterbased-dries clear and easy clean up-IDEAL for Scrapbooking! I use plastic or metal utensils (spatulas) to apply the paste and wipe clean when done using and be sure to put the lid on all the way-don't want the paste to dry up on you- once it dries it is permanent. This jar probably lasts me 3-4 months or about 100 or so 12 x 12 pages. Use sparingly: remember a little Yes! Paste goes a long way. I use this paste for everything on my scrapbook pages, pictures, paper, rhinestones, all embellishments, I always have an extra jar handy so I'm never left without my YES.
Other adhesives that I like are the mounting squares for my pictures if I don't want to use the paste, especially the temporarily repositionable ones when I'm playing with a layout or what to be able to remove and make more copies at a later date. They are sold in permanent squares also for about $3.00 for a box of 500. And if I need to apply an adhesive in a small area or be able to direct the glue ( precision tip) I like to use Scotch Quick-Dry adhesive in a 4 oz bottle-photo safe-acid free-dries clear-no mess for about $5.00( prices vary). I have only been able to find the Yes paste at Michaels and sometimes Hobby Lobby...so go use that 40% coupon this week and get the jar of Yes paste -You'll wish you had known about it before. Would love to hear from those who have used this paste or let me know what you think after you go buy some this week. See you next Friday. Debbie

L.I.D. Challenge -5/15 - 5/22

Here is my take on sketch #1 this week at LID challenge. I added a picture and kinda change things around a bit..but this worked for me. I used carts for the butterflies and the flower petals and inked edges on the peurple ones. Used K&Company papers and trimmed or cut out for the scalloped border and inked edges in teal. I used silver glitter glue on the butterflies

Practical Scrappers-Patterned Papers/L.I.D. Challenge from 5/15-5/22


This is my take on Sketch #2 this week for L.I.D. Challenge on the Cricut MB, and using this for my entry at Practical Scrappers for Patterned Papers. I used several patterned papers from K&Company and cardstock in teal  and purple which was the colors in our wedding in Sept. 2000. I also used some floral lace put cut and seperated them and added some green and blue gemstones to the middle of each of the flowers, then used a silver gel pen and doodled around them. I used my cricut and my Gypsy to cut out the bride and groom using WC and the words in teal and purple cardstock using PS and welding them together and also outlined them in the silver gel pen.Here is a picture of them together as a 2-page layout.

My Little Sketch Blook Challenge

Here is my take on My Little Sketch Blook sketch...I used a purple word background paper and cut circles from K&Company black and white patterned paper and inked edges in Teal. I then used my Gypsy to weld the letters for the title using the JAS cart and then used black stickles on the black part of the letters. I  used Wild Card cartridge for the roses and put red stickles on them. I attached some purple ribbon to the small punched out circles. This is our Wedding in Sept. 2000. My husband and I, my mom and my 4 children, attending our backyard ceremony.

Creative Scrappers sketch #104

Here is my page for Creative Scrappers Sketch #104. I turned the sketch sideways to fit my pictures better. I used K&Company paper with torn edges and hand drew a stitched edge around the border, and stamped with black ink some simple flowers on background then used my big bite to punch holes in the center of all the little flowers and on  back of the white cardstock I put  purple paper. I used a wide teal ribbon and crimped it and glued a black and white polka dot ribbon on top. I then stamped some more little flowers on purple paper and cut them out and put stickles glitter glue in teal ,white and purple on them and attached them on top of the green leaves that I used carts.-  Gypsy Wanderings and Stretch Your Imagination to cut them out.

Monday, May 17

I'm back from Nationals and can't wait to SCRAP

     I was in El Paso,Texas for the Women's National Bowling Tournament for the past 5 days and can't wait to get back in my scrap room. I had a great time down there and the weather was great sunny and warm the whole time and I bowled pretty good too, but I so missed my scrapping and blogs, lol. Now that I have got all caught up on the new challenges and saw everyones great projects for the past 5 days I can go downstairs and start scrapping away. Oh, I did bring my Gypsy with me while I was in Texas and did a few projects on it to get a head start on some pages I have to do, but it just wasn't enough--- I wanted to get to my HOME SWEET HOME.

Friday, May 14

Welcome to Frugal Friday #2

I'm so excited to share this organizing tip with you today,because it's one of my best investments-ideas yet. I have tried several different ways to organize my  ribbons/fibers from boxes with cut out holes-to-individually wrapping them on floss boards. This is a huge over the door shoe rack which I purchased at Bed-Bath & Beyond for $29.99 plus used a 20% off coupon, total cost $23.20. As you can see it (most of it) has 12 spindles in the front and another 12 spindles behind which can each hold up to 20 spools of ribbon. In order for some of the packaged ribbon to fit the spindle I had to cut a larger hole on each side of the spool and then just slide it onto the individual spindle. I have grouped my colors together and some are in theme groups, such as Holidays, baby, and sayings.
As far as my fibers/yarns and rick rack I have them in  seperate boxes of there own. I have taken index cards(doubled) or chipboard and wrapped the yarn and fibers around them with a notch in a corner to secure the ends. Same for the rick rack, its on the boards when purchased, but if I find some without I wrap them same as the fibers/yarns. Since I don't have as many of them I only need a small container. I like the see-thru ones for obvious reasons. If you can't see it-you forget to use it. And another tip is I have a huge glass jar for all my scrap ribbons/fibers on display with my buttons and flowers as seen in post week #1 Fugal Friday. Looking forward to next week. Debbie

Wednesday, May 12

Creative Scrappers- sketch #103/Practical Scrappers-Punch

This is my sketch to enter into the challenge at Creative Scrappers this week. I had so much fun doing this layout and I just LOVE how it turned out, which I did spent a few hours on it, but well worth it to add to MY scrapbook. I used several papers from K&Company for the main 2 layers, border punch by Martha Stewart and Fiskars for corner punch. Used a white/clear vellum for the journal area and ink edges in Lilac.

The flowers I made using my cricut carts of AE  GW HA to cut out the floral patterns I then layered the different sizes/shapes together and attached a silver brad that I heat embossed  green, gold or blue colors. I then used Tattered Angel mists on them, a variety of colors. I used a vellum Slick writer for my words. Cut out a few words from paper/chalked them green and attached to the flowers.

The Title Children I used my Gypsy and 2 different letter fonts LL  PS and welded together and inked the edges in lavendar and added sticker rhinestones to it. I cut from patterned paper 3 butterflies and added Stickles glitter glue to them and attached just at the body part. The leaves I hand cut and used a dash ---in marker to highlight them a bit.I cut out 2 hearts in the K&Company blue paper and attached a vellum saying behind one of the hearts, added rhinestones and glitter to the hearts also.

I wrote in black marker on top and bottom border the saying " A mother holds her children hands for awhile, and their hearts forever"

And this is a close up of my 4 lovely children on my Wedding Day in September 2000. They were so wonderful that day and as you can see by the smiles they were happy too. I can't wait to put this one in my special Scrapbook of my special pictures of my children as they are growing up.

Monday, May 10

Our Wedding /Cheryl's scrapbook pages.

Here is a 2page LO I did for my DD cheryl's scrapbook of our Wedding  in 2000. I used the sketches from the LID challenge 5/8-5/14 which worked out so well. I used lavendar cardstock on bothe and some teal floral paper and some prelined paper for the journal areas. I used GF for all the lettering and sprayed them with a purple glimmer mist. other embellishments include silk flowers, pewter heart brads, ribbon, glitter ink pens, and leaves cut from AE on scratch green paper, inked edges in lavendar and teal.

Frosted Designs "something sanded"

Here is my layout this week for Frosted Design challenge to use something sanded. I used different chipboard colored letters and sanded them. I also painted the black cardstock in 3 different acrylic paints, blue yellow, white. horizontally to give the layout movement of a runner.  I made a journaling tag with a RUN sticker and painted on teal cardstock and attached 4 circle brads. The runner is also a large sticker and some word stickers on each picture. I used pop dots to attached the yellow X-ing sticker on white cardstock. These pictures are of my DHin May/2000 at a 5K race which he placed 3rd in his age bracket...he did great.

Practical Scrappers Sketch by 5/14

This is my Layout for Practical Scrappers this week of my favorite girls Izzy and Jenna (our 1 year Eskies) taken at Christmas time 2009. I used 2 snowflake black and white papers  for background and curled the torn edges of the the white paper, used a red vellum and green glitter cardstock for the matted photo,gold cardstock for the 2 strips under photo, and a cut out of a tree from some patterned paper.The holly and ribbon is also cut from some patterned paper with my exacto knife. I used Gypsy Font for the word Joy in the gold cardstock backed with green gliiter cardstock. I put some holly rub-ons on the corner brackets of the picture and used circle punch for the journaling tags.

L.I.D. Challenge May 8-14 Sketch #2

Here is my take on Sketch #2 for the LID challenge this week. It will be a 2 page layout along with sketch 1(this being page1 on left side). I used all the same papers and carts for this LO as the other- same with the embellishments. I do believe I used HA for the Love heart border on bottom of page.

L.I.D. Challenge May 8-14 Sketch #1


Here my take on sketch 1  for the LID challenge this week. Used purple cardstock and some teal floral patternedpaper and lavendar paper, along with some prelined/scalloped paper for journaling. Used GBS for the "Its your day" title and not sure what cart I used for the hearts, but I think it was Home Accentswith 2 purple cardstocks. Other embellishments used are silk flowers, brads, teal ribbon,white grossgrain stamped with love love love, sticker rhinestones by Stampendous, jellyroll stardust markers. These pictures are from my wedding(2nd marriage) in 2000 with my 4 children.

Friday, May 7

WELCOME to Frugal Fridays #1

I thought I'd start posting on Fridays some of my ideas and tips on saving time and money and lots of tips on organizing stuff here to share with you. I hope some of my ideas or tips help and inspire you while you are scrapping or crafting, I've been crafting since I was in High School and there have been some tuff times during my life. Which, I had to watch every penny spent and manage my time with 4 kids as a single mom..so I learned how to save money, time and I am a very organized person...which in the long run saves you both. So with that little note onto the tips of the week.
You dont' have to go out and spent all kinds of money on fancy containers to put your embellishments in when you have them right in your kitchen already. Some of the no name brand jars(Great Value-Walmart) don't have there logos on them so you can just wash them out and use Goo Gone to get the sticky residue off. They usually have colored lids which works out fine or you can spray paint them to whatever you want. I find that the wide mouth jars are better to put you silk flowers in and the smaller lids jars for your buttons. So I exchange my Got Flower jars and put my buttons in them and flowers in my own  re-used jars from the kitchen. It makes it easier to get them out and put back the flowers not needed in the wide mouth jars. And of course, I'm always looking for fancy containers at garage sales, or some pre-packaged containers that we buy some of our supplies in. Well I hope you come back next week for another tip or two at Frugal Fridays. Enjoy your week.  Debbie
And as mentioned in my Original posting about Frugal Fridays coming, I posted that you should come check it out and be one of my First 100 followers to be in a drawing for some blog candy. So go check out my next post and find out what the blog candy will be and leave me a comment.

Wednesday, May 5

A New addition to my blog...

Starting on Friday (May 7th) I will be posting ideas for those scrappers/crafters who like to save time, money, organize and have fun doing it, on a weekly basis. I will be calling this post- Frugal Fridays. So stop by on Fridays or when you get a chance and see what I have posted for that week and leave me a comment on what you think about my ideas. Everyone loves to hear and try new ideas, especially when it comes to saving a few pennies, a few extra minutes and I love to organize, that saves time and money in the long run. Be one of my first 100 followers and I will have a drawing, which I will announce the blog candy in the first posting on May 7th.

Practical Scrappers Challenge- Stickers

Here is my LO of my DD while she was visiting her grandparents in Arkansas and made her own new recipe called Roasted Peanut Butter Smores -over the campfire. The title New recipes and Me and You, Fun and moment in time and one other are all stickers on this layout. other embellishments include silk flowers, brads and cuts from the 2 different papers used.

Monday, May 3

Practical Scrappers Sketch due 5/7

I am entering this layout over at Practical Scrappers. I used Bo Bunny paper in green, the scalloped striped red and white edge paper is October Afternoon, and the tree paper in strip on top is Teresa Collins.I inked all edges of paper and pictures in coffee bean by Paper Salon, Fiskar paper edgers "victorain",used slick writer on vellum stockings attached with jeweled brads, and paper punches for the Title  "All The-----Were Hung". I like to take a picture of out very decorated Christmas tree every year, showing all the gits under the tree on Christmas Eve...brings back some great memories.

Creative Scrappers sketch #102

This is my entry for the Creative Scrappers sketch challenge #102. I used purple cardstock and layered the many different shades of purple patterned  papers behind the picture, which I matted in teal cardstock. I used my Gypsy and JAS for Happy New Year  & 2001, which is the negative and put teal rice paper behind the title. SYI for the champagne glasses and DC for the 2 dimensional stars. I traced the letters and the border with a silver metallic gel pen and used ultra fine glitter on the stars and the white part of the champagne glasses. I then hand stitched with a silver metallic thread all around the edge of the layout. Attached 2 star brads with the metallic thread in between the tags.This is a picture of me,  mom , son #2, husband on New Year's Eve 2000-2001.