CLICK HERE FOR FREE BLOGGER TEMPLATES, LINK BUTTONS AND MORE! »

Monday, June 10

Some colorful 2 page layouts I have worked on for a friend and finished up her scrapbook album for her- Cruise from Barcelona to Italy. Both of these layouts had lots of pictures to be included and so I thought I would use color to make everything really pop.


 I used my Gypsy to cut the titles out and I used some special  silver shiny glitter  paper for the top layout and some stars, with some black and white polka dot ribbon-plus matted all the pictures with white cardstock. WOW-- 15 pictures on this 2-pager
 Now this bottom layout I used some bright colors of purple & blue and torn the paper and laid it to resemble the pictures of the show that they were attending. So with that, I also added a bunch of colorful ribbons that I tied on to string across the two pages. I didn't matt the pictures, instead I hand painted with white acrylic edges on all photos- I really like how the Amazing Acts 2-page turnout.


Saturday, June 8

Yummy Yummy

Mmm Good.....and Yummy, Yummy
    I wasn't to sure at first how to scrap some pictures of desserts from Italy- but I played around a bit and came up with this colorful and attractive layout- after all-for my friends trip to Italy. I used my Gypsy to weld my titles and make the ice cream cone. Simple colorful alpha pink paper in my scraps and some lavender graph paper (not to distracting against colorful pictures. And of course covered the words yummy in purple stickles and did some colring on the cone and matted the one picture with white cardstock. .It looks Good!

Friday, June 7

ScrapCabana Retreat - Here I come!

      It's that time again to pack it up and go on a weekend scrapbooking retreat- with my friends!!!! I am getting so good at organizing and packing for these weekends -I have 83 pages laid out to work on this time, which will be amazing if I get them all done- my record to beat is 62- so I will be very busy this next three days. I purchased my ( Crafty Gizmo's) Thirty-one bag the end of January- so I'm excited about using it to carry all my Cricut Expression & Gypsy and all supplies in it for the 1st time. I also went to a garage sale this morning and found these 2 collapsible storage racks for $1.00 each- great find and will be put to good use at my table- saving me more space to work on layouts.
     My 2 rolling carts with 6  12 x 12 containers (=12) are filled with all the embellishments and supplies needed to work on these 83 layouts, my black tote is filled with all the bigger tools like Cuttlebug, big bite, trimmers, punches and tools, and the other container is all my Cuttlebug folders-plus my handy cart which is a life saver to haul all this stuff into the retreat- only ONE trip in which makes it nice. Well- I'm off to have some fun with the girls at the Scrap Cabana Retreat in Aurora, Il this weekend- Michelle puts on a great time at a very reasonable price too- I linked it for more info of these retreats available for 10 months out of the year.. This is my 5th time going to this retreat and I love it!!!!

Thursday, June 6

Challenge Me Happy #47- Name

Oh this is such a wonderful layout I did for my cousin the other day- and just in time for the Challenge of using a name for Challenge Me Happy. It took me long enough to finally do this for her- so she can display it in the baby's (Joshua) room.
I used several Cricut cartridge cuts all with white cardstock(doubled and used pop dots to give a 3-D look) and added a few other embellishments like the safety pins and chipboard sayings. I cut the letters out from a letter (alpha) book and used some blue designers papers in blue gingham and a polka dot, added some baby boy ribbon and was done. 

Friday, May 17

Happy Birthday MOM

   Just a little card I will be sending my Mom for her Birthday this weekend...she and I both love butterflies, so this is just right for her and it was fun for me to make. I don't make a lot of cards these days so ,this was was truly made with Love.
 I arleady had the colorful Mom paper in pink and green so that's the color themeI used for the other papers. The cute polka dot backing for banner and hand wrote M O M on the flags in black fine marker. Added the cute bows, punched butterflies and then of course, white/clear Stickles. Inked all the edges in a Moss Green.
Added a few butterflies to the inside and my sentiment and it was done....simple and so cute!

Thursday, May 16

Bowling in Reno for Nationals

Well its that time of year again!!! When I go to Nationals for the USBC Women's Bowling Tournament and its in Reno, Nevada- again this year. So, for the past 10 years its a tradition for me to make these small cards for all my bowling ladies that go, which is usually about 80 of us...but this year its only 40- so it didn't take me as long to make this year which is good...I have been so busy with other projects.
The card is about 4 1/2 by 2 3/4 inches and on the inside I have hand written some info that the girls can fill out as they bowl there nine games and then the bottom inside half is where we can put out wallet size team picture- to keep from year to year. The girls just love it and kinda expect me to keep making them, so that's what I did on Mother's Day this year- last minute. Because we leave today to go to Reno and bowl. I can't wait we have such a good time every year.
 I don't remember which cartridge I used for the lettering, but I like it and of course I used 50 states for the Nevada cut, just stamped the bowling pins and then did some doodling and added the year.

Wednesday, May 15

Diaper Cakes I made for the first time

Just a few more projects I have been working on for the baby shower I'm hosting for my daughter in June...getting so excited about this new arrival of my first grandchild!!! So one of the decorative items I wanted to have on display was a diaper cake...which are so cute but I have needed tried to make one before so being my first grandbaby I had to give it a try.
 The first one I made I tried to have it look like a toy box which I'm filling up with baby toy items like books and stuff animals, rattles, pacifiers and all those little goodies. I also sewed a receiving blanket and matching burp bibs which is in this basket also lined with many newborn diapers.
 Then I got more creative and made a diaper stroller and but a burp bib as the blanket for the cute lion rattle. I really like how this turned out- especially for my first time at making these- so much fun. I will be posting all kinds of baby shower projects in the next few weeks before the shower- I have a long list of projects to do.

Tuesday, May 14

A Graduation card for a Deacon

It's that time of year for graduation's..so I made a card for a friend of mine who's nephew is graduating and becoming a Deacon. And this is what I came up with for her and also will be applying this over at FCCB #160 this week- with the theme of graduations and also TPE199 for a Masculine card

I used the Wild Card cartridge and Heritage for the 4 cuts that I have on this card. I layered several papers and inked all the edges. I found this saying online and thought it was just right for this card.


Monday, May 13

Link up your craft room

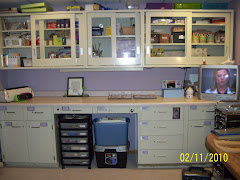
I found this blog from Lori A-just this morning and loved it. Craft in Desert Diva's and they have a challenge every other Monday...and today was link up your craft space...which is my favorite place to be. So I am posting the one picture
http://debbiebakk.blogspot.com/p/my-scrapbook-room-updated-9710.html
  with a link to many more of my favorite space... This is just the entrance to one of the rooms- my main area and where most of my supplies are. Since 2008, when I started this little hobby- it has now taken up a little more space for all my supplies- three rooms in my lower level of my home. I am consistently reorganizing my areas...but, this pic is the most recent one that I have taken. I will have to update it again soon. For more pictures you can click on caption or go to my right side bar under pages...my updated scrapbook room to see more and get some great storage ideas.  Happy Scrapping!

Friday, May 10

Time to make the donuts

Time to make the donuts...this was taken of my son years ago one morning when he was getting ready to go to work...and, Yes he worked at Dunkin Donuts for the summer. As a kid he would always tell people he wanted to be the donut maker- and look at him know. Too funny!  I will be applying this layout over at Lasting Memories to scrap only one photo on a layout...this is pretty simple. I used many Cricut cartridges to do this layout and decorated all the donuts -chalked and added glitter to them. Also used a recipe card to journal on about this event. I'm sure my son will have great memories when he comes across this page in his scrapbook in years to come.

Thursday, May 9

Travel Log 2-page layout

Alot going on in this 2-page layout. Photos, postcards, itinerary-lots of handmade embellishments and journal spots. wow-can't believe I got this all on here- and it still looks good. I just used a plain graph like paper for background -since so much was already going on here and just arranged all the photos and cards to fit.
 I made from cricut cuts all the embellies life saver, ships wheel, lounge chair, luggage and large anchor. Cut out portions of their scheduled cruise and positioned them so they could read them added a few precut words and saying to the page and I was finished - this will probably be the first page in this album of hers

Wednesday, May 8

Gates of Paradise in Italy

A few more layouts from Italy- these photos were so hard to work with- at least for me- the embellies were hard to figure out ..so I the top pic I used a tag to explain the gates of Paradise in the photos. I used copper glitter on the lettering - just like the doors in pictures.
 And this page is just a postcard of one of the places they went to while on their vacation so I used a map paper and tore the edges and cricut cut the title out added a few rhinestones and faux stamps and was good to go with this layout

Tuesday, May 7

The real deal

Another one of my pages I did for a friends  vacation /cruise to Italy. This 2-page layout was different- it included postcards, tickets and photo's that she wanted in her layout- so that I did. I like how I used my cricut cut to do the torn page edges and inked them then with Graphically Speaking did "the real deal" cut and pointed finger and scenic route also. Just added some clouds and a precut embellie of the tower and it was done simply and got everything she wanted on these pages

Monday, May 6

Woodland Creatures-Playroom

How adorable is this- my future grandbaby is gonna love to play in his or hers new playroom. The designs were inspired by Create a Critter  Cricut cartridge. My daughter and I worked on this project for 2 days a few weeks ago and I couldn't be happier on how it turned out. LOTS and LOTS of painting.  (heavy on pics)

My daughter drew with chalk everything out before I arrived- she is also very talented in drawing- so that I thought was the hard part so let the fun begin - I love to Paint!


The cute owl


which is were my daughter decided to sign her name


The red fox
which is were I decided to put my "grandma signature .. on the stump sideways


 and my favorite part of the whole room is the happy sun and clouds they turned out so cute. We added three shelves into the room one right underneath the clouds and 2 brown shelves in the tree limbs (see first pic) and the last pic is on the other short wall with a whimsical tree and a few animals also. So creative- and we had so much fun together doing this wonderful project. Now I can't wait till July when this grandbaby is due!!!
 

Saturday, May 4

My new recycled- Mail Center

Ok- our probably thinking what is this made from???  Well I'm known not to throw anything away- you never know what it could be used or recycled for someday. Well, that's exactly what I did with this project. The wire rack in the background is from an old china cabinet (window inserts) that I took out and just put away for a rainy day- which it has been doing a lot here in the Midwest. I also just happened to have these two wire baskets in my craft storage area and thought this would be great to make some type of organizer for mail or something...so with that thought- I played around with these wire items and came up with this mail center for my laundry-kitchen hallway area
 Then after I finished hanging this up I needed something to decorate it up a bit...so again in my storage I found this metal plaque which I purchased a few years ago at a scrapbook expo for  a dollar or so and painted it up in my favorite colors (greens) and attached a butterfly and some rhinestone medallion and hung it at the top of my mail center.

Then it still needed something in the middle??? So went on another search in my home and found these old picture frames made in Italy that I had received from my grandmother years and years ago- didn't like the ugly flower picture in them-yet couldn't open the backs up to take them out- So I just  covered them up with the paper and my wording  with some punched butterflies attached and hung them on the wire rack with s hooks.

Now when I get the mail and come in through the garage/laundry room instead of just putting it on the table - I can organize my mail into this mail center ..I love it and love to be organized also.

Friday, May 3

Decorated canvases- wall art


Now- this is a project that took me some time-over a few days of planning and doing...but really like the outcome and have it proudly displayed in my dining room. I purchased 10 art canvases for $15.00 -but only used 7 of them in this wall art. I first sketched out my idea and then painted(acrylics) the background in a dark purple blue, then with rubber stamps and paint did the scattered leaf stamps in green. I hand drewn the words in white and used a ruler for the white stripes. Then with a few other colors splattered paint on all the canvases. So now all the painting was done- had to let that dry. The next step was to attach all these canvases together in the pattern I came up with. So on the backside I attached them with strips of wood and small finishing nails to hold them all together.
Now for some more fun stuff- all the embellishments!
I made a purple two toned banner which was also embossed with my cuttlebug..and used sticky alpha for Family and Friends on banner. I made my own flowers and punched  butterflies & added brads & rhinestones. With my Cricut (songbird or Serenade) I cut the fence w/bird , birdcage and doves and laid them out according to my sketch. Of course the last finishing touches were the green inked leaves (see top pic) and some Stickles were ever needed. Another wonderful handmade project for my Home!

Thursday, May 2

R is for Richards....


How adorable is this...which is now on display in my daughter's bedroom above her bed with lots of picture frames to be filled with photos. Another project I worked on with her last weekend...we had so much fun doing all kinds of crafts-especially this one!She purchased this paper mach'e letter R for $5.00 which is very large about 2 feet high- then we took our time selecting papers and colors and lots of fussy cutting. We decided to just paint the edges in a dark mustard yellow- first. then after all the cutting we laid out everything in its spots and one by one decoupaged everything in place. Then added 2 more coats of mod podge and whoolah it was finished in about 3 hours. Now I want one of these for my bedroom - well a letter D- add it to my list of things or projects to do.....

Wednesday, May 1

Welcome Spring!!!

Finally, Spring has arrived. was getting so tired of the rainy cold spring we were having. So I went downstairs the other night and whipped up this cute door wreath- not your traditional wreath though. I used chipboard and cut out 3- W"s and glued together then found some papers that were very colorful and spring like to cover the W. (size is 12 x 8)


 I then went into my stash and pulled out a few items like the bird and cut out butterflies and silk purple flowers and rhinestones attached them . I made a cute banner with colorful scrap papers and used sticky alphas for the lettering of Welcome  to my nest.

These photos don't pull out the wonderful colors that well against my spa blue door...but the background color of the papers are a  lime green ( my favorite color)

I also made a nest out of chipboard pieces that I just cut and inked and layered them on to resemble a nest. Did some doodling on the banner and then found some raffia and blue silk ribbon and hung it on my front door. Welcome Spring!!!!

Tuesday, April 30

Baby shower projects

Well, I have been really really busy with this baby shower I'm hosting in June for my daughter- I want to make everything-So everyday I'm in my craftroom working on something and here are a few of the finished projects I have done so far- but the list still goes on   lol

This is a shoe box filled with little note pads ( purse size with 24 pages in each) for all the guests in there goodie bags along with some cute and inexpensive bookmarks I made with paintchips and just stamped some designs on, hole punched and tied on a scrap piece of ribbon ( great way to use those scraps up)

 Then  made a sign for the front yard to display...Richards Baby Shower in yellow and green with a cute stork cut from Cricut cartridge( not sure which one tho) I think it was Lyrical Letters. I actually cut the words out on the 12 x 12 and then back it with yellow cardstock and the stork is cut out and attached to it.
 At the shower I though all the guest could write down there predictions of when and what- Boy or Girl?  on this calendar I made with her due date circled with a  heart. So they can write there names on their guess for the date in pink or blue...
Another poster like for the shower with some elephants that I bought from Archivers the other day- cut and stamp- so cute I have been using these elephants a lot on projects- more to come.
The scalloped punches with ribbon are to hang from the lights in the middle of my kitchen and dining room above the tables. Which I just found all kinds of baby related stamps in my huge collection and then colored them in and they are two sided -so when hanging it can be seen from all sides. I thought why spend lots of money in the stores for these same kind of items when I can make them so cheap and much cutier!

Monday, April 29

Baby shower invites..too cute!

OH BABY!!! I had so much fun designing and making all 76 of these invites for the baby shower I will be hosting in June for my daughter- who is having my first grandbaby...so exciting!!!!
I used white cardstock and made my own pattern for the diaper- getting two diapers on one sheet of 8 x 11 -folded and inked the edges and tied a ribbon in the middle. Then punched the center scalloped circle and used a baby stamp and also inked all the edges- along with a little Your invited tag.

Then on kraft paper and using my computer and printer made the invite on both sides and cut to slide into the diaper. I hand stamped a design on top and bottom of invite  and of course stamped my name on the back of these cute invites to send out this week.
The color theme for the shower is greens and yellows because its a gender neutral -its a surprise till the due date in July.