CLICK HERE FOR FREE BLOGGER TEMPLATES, LINK BUTTONS AND MORE! »

Sunday, October 31

A couple of "Thanks" cards

These are the two cards I made for the challenge at Aud Sentiments this week to use the word "thanks" and I couldn't decide between the two so I'm putting them both on here. I used the scraps from a layout I did with brown and orange colors and thought with this time of the year the colors were great to make a few cards instead of putting the scraps just in a pile.
 I embossed both the birdcage and the tree and used black, brown and coral inks for distressing.

Friday, October 29

Hanging with The Blues Brothers

Here is my take for Creative Scrappers sketch #127 and also for Embellishment Magazine color challenge of green, yellow and rust with a vintage flair. I used K&Company, My Minds Eye 2 sided designer papers, and black cardstock. Used the Cricut cartridges Heritage, Home Accents and Wild Card, many ditress inks by Tim Holtz, polka dot ribbon and 3-D gel pen and black fine marker. My thought of the 3 big circles were they kinda looked like the tires on the old car, also wrote part of my title of the flags hanging underneath the ribbon.

This is My husband and I in Las Vegas strolling along the strip and had our picture taken with the Blues Brothers in front of Imperial Palace back in 2003. I love to visit Las Vegas as much as I can so I would go at least 2-3 times a year and both of us went usually in the fall. If I could only talk my husband to moving out there! Now my excuse to visit more often is my daughter lives out there and I need to see her.

Welcome to Frugal Fridays #26

Wow time flies when your having fun...and I'm having a blast with all my scrapbooking and blogging and my Frugal Friday posts. This is my 26th post -so 1/2 of a year and I plan on doing 26 more- 1 years worth of  tips for saving time, money and especially all my organizational tips- I just love to organize. So this week I have for you....some cleaning TIPS!
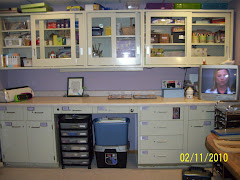
    I saw this in a magazine a year or so ago and just remembered what  I read just the other day and thought I'd give it a try and BOY does it ever work. Mr Clean Magic Erase pads  are wonderful...As you can see in the picture I have cleaned half of the blocks on the left side and all of the stamp blocks on the right side with the erase pad on top right. They look brand new.  So ---why not clean some other tools! I wiped my scissors blades, my bone "for card making"  (who ever came up with that name for this tool..lol) spatula for my Expressions,  glass/ rubber cutting  mats, exacto knives and my table tops from all the inks and spray residue and it worked great...All you have to do is purchase a box , which contain 4 pads, and wet them a little and wipe/ clean then throw away. I would cut the pads in half  if you don't have much to clean up and save the other half for the next time.
  Another tool that I clean quite often are my cutting mats for my Expressions (Cricut). They seem to need more attention than any other tool I have (maybe its because I do alot of cutting) But I don't have to replace them to often -in fact I think in the past year these are number #3and#4 mats that I have used- not bad I'd say. So when I do clean them I scrap off as much as I can (tiny pieces of paper-lint etc), then I wipe and scrub them with non alcoholic baby wipes-which sometimes takes a bit of elbow grease to do-but worth it. I let them dry and replace the clean cover sheet over the top and hang in its place on the wall by my Expressions and is ready to work with for about another month. I find that if you use the whole 12 x 12 mat when cutiing it helps also- instead of always cutting in the top corner. If you have a Gypsy this is so easy to configure on the  screen. What I have done with my older mats is save them and use for table top covers when I spray inks or cut stuff or just to save the table top from messes-  I never throw anything away, I will find another use for it somewhere. Well I hope these tips help you out-I know the mat cleaning is something you probably have already seen somewhere else- but Mr Clean Magic Erasers is a must have in your craft room. Happy Scrapping!!! and Have a safe & fun Halloween!

Thursday, October 28

My boys and there Volleyball...

Both of my boys just loved the game of Volleyball and so when they reached the age to join team sports in grade school they did them all , but Volleyball was there favorite. So I did a few pages the other day-which I found to be kinda hard to do-no flowers or thrills with this topic. So I went to my Gypsy and found a few cuts that pertained to this sport (Sports Mania) and did some simple layouts that I really like.
 Each page is a little different in the layout ,but used all the same papers (large volleyballs), and cuts for each one-so I finished 2 pages fairly quickly. I used a white gel pen to trace inside the cuts and add AUGS (school initials) and the year.
My boys are only 17 months apart so there was a bit of competition all the time between these two-but when they were on the same team -Watch out they were good.... Top photo is Eric in 7th grade and bottom  is Brian in 8th grade.

Wednesday, October 27

Fun on the Lake-layout

A summer themed layout of my daughter at my Uncle's camp in Michigan and having fun all day on the lake. This layout is for Sketchabilities #33. I love doing layouts with a circle-so this one was a must to for me. I used Chatterbox paisley paper and my Gypsy to cut out the scalloped edge and just reversed the 2 sided paper. Some misc scraps for the journal stripes and used cartridges Lifes a Beach for the sun and title words.Other embellishments are vellum transparencies that I drew & cut out water spouts and painted with white and blue on the back side, stickles, chalks in green and orange, stardust gel pen, and a fine brown marker for some doodling around the scalloped edge..

Tuesday, October 26

Girls just wanna have fun-Karaoke

The photo's are not the best, but this was taken when I took my two boys camping back in 2003 and they met many new friends-all girls of course...and the camp ground had many fun activities for the kids and on Saturday night it was Karaoke night and they all had a great time. So this page will bring back some fun memories for both of my boys I'm sure. So I did a girly color page for my son's scrapbook-
This layout is for the challenge at Sketchy Thursday and the materials I used are: All My Minds Eye papers, multi rick rack ribbon, teal ink, Studio G chalk ink in brown, Wild Card cartridge for the title, and musical notes that I drew and cut out to do some journaling on.

I think I can! layout for Sketches in Thyme

I just whipped this layout in no time-everything fell into place. Usually takes me awhile to figure out papers but not with this one. I used several different ones -K&Company, Colobok, DaisyD's, Bo-Bunny and DCWV Alpha circles. Other embellishments were embossed stickers, Paper Salon Spa ink, red and white polka dot  and yellow ribbon, pop dots, misc cardstock for mats and machine stitched around the border of die cut edge in white, added a cute little spinner embellishment by K&Company in the middle. This is the sketch from Sketches in Thyme #20 this week.


Monday, October 25

Largest TREE I've ever seen....

Again, I loved doing this layout because its a nature one...This was when we were in California by Lake Tahoe and I couldn't believe the size of the trees- One of my goals in life is to visit the Redwood Forest-but this is the closest I've been to that- someday I will go there. This is a layout for Frosted Designs this week to use Die-cuts, which I used for the title and the trees.
 Materials used are: My Mind's Eye and SandyLion papers, colored cardstock,orange cord, green fibers, Fiskars circle cutter, white gel pen, brown and green inks, fine black marker, and the cartridges used were LAB for TREE, CC for the small trees, and PS for title -largest Ive ever seen. And of course my Gypsy and Expressions to weld and cut

Sunday, October 24

Lots of Red ,White and Blue on this page...

Another 4th of July layout this one for Sassy LiL Sketches and this page is for one of my daughter's scrapbook (I have 4 kids so many repeat pictures) for many different books. I used medium blue cardstock and a textured red designer paper for the star which I did a zig-zag stitch on in white, Recollections Star border punch that I back with white paper, star shaped buttons threaded with twine, spray ink in dark blue, prism stars,some misc holiday chipboard pieces and Cricut cartridges used were 50 States, Storybook and Jasmine and of course I did this with my Gypsy (I can't do anything without her)
I will also apply this over at Frosted Designs this week for using Die-Cuts, which I have a few of them on this layout.

Saturday, October 23

4th of July layout for Creative Scrappers #126

Here is my take this week for Creative Scrappers- I just love there challenges every week.This layout is for my son's scrapbook and was taken back in 2003 up in Michigan at the 4th of July parade that we go to every year- a family tradition we started back in 1994.This year my Uncle had there 40th reunion and he was on the float, and threw Jayden my cousin (in the photo) alot of candy.
 I used dk and medium blue, red and white cardstock, misc red white and blue paper -with an accordian fold for the banner like flags at top and side of layout. Two doilies in the background, Cricut cuts from Storybook for the letters, stars from Doodle charms and GBS and my Gypsy to weld together. Other embellishments are Stickle, Le Plume red marker and white ink for page edges.

Happy Birthday-Sweet Friend card

I'm really getting into making cards again-years ago before I started scrapbooking- that's all I use to do make was cards-and since then I rarely do cards unless I'm making one for a certain occasion. So this has been kinda fun just making a few cards once in awhile. This card is for The Play Date Cafe #52 to use orange pink or yellow and I choose all 3 colors-cause they go so well with each other.
Found some papers in the colors I wanted and did a Cuttlebug embossing on it and inked it with orange-then cut some flowers out of the paper and pop dotted them on and added stickles. Stamped a few sayings and outlined then in stardust pink gel pen -sweet and simple.

Friday, October 22

Welcome to Frugal Fridays week #25

 I just purchased my Cuttlebug back in July (after the CHA Convention I went to in Rosemont, Il) -I can't believe I didn't have one of these embossing machine before this- I love it. So of course-now I'm buying folders and templates all the time and so its just another item I need to organize in my room. I found this rack laying around in my craft closet-to put my Cuttlebug on top of and all the spacers nestled underneath which is  on my countertop. Then I bought this storage container from Michaels (on sale of course) for $7.00.
 I then labeled each of the 6 sections into catagories of my folders and die-cut templates and had a few extra  spaces for my old Fiskar templates and the old metal "gold" embossing templates that I have. I also learned something this week when I was at the Milwaukee Stamp and Scrap Expo- you can use those old metal templates to emboss with also on your machines- you just need the rubber spacer mat that you can purchase. This is so cool- love getting new ideas from others.
I had purchased some Spellbinder die-cuts at the convention also and with it came this very informative piece of paper with instructions of all the different spacers needed for all the different die-cut and folders on the market- so I taped it to the inside of the lid of the box for future reference. So I'm having fun embossing now-hope you do to. See ya next week and don't forget to leave comments on any of my posts to be in the drawing for my Family themed blog candy giveaway- when I reach my goal of 365 pages completed for 2010- only 19 more pages to go.

Thursday, October 21

Corn Maze

Here is my take this week for Frosted Designs challenge "Halloween-Fall Theme". This layout has carving pumpkins, decorated yard  and at the corn maze photos and its all done in the fall colors, this layout is for one of my kids scrapbooks. I used a fall leaf pattern paper, maroon cardstock for mats on photos, some scrap papers in pumpkin colors for the stamped  and cut out pumpkins. Used alphabet stamps stamped in brown staz-on ink for the title and then matted them on a maize colored cardstock and cut them out and used pop dots. I used the brown gingham sticky ribbon on the bottom, made a journal tag-inked and tied an orange cord.
Wednesday, October 20

A walk in the Park

I just love doing layouts of the outdoors-it must be the colors and the nature theme that attract me, so I really enjoy doing this sketch from SOUS this week. This will be my first entry into this blogsite challenge- the competition there is pretty tough-some pretty talented gals over there-but I always love to do there sketches.
I used Memory Makers die-cut circle, DCWV cardstock in mustard and brick. I embossed the background with Fiskars "stones" template and then inked over the top-same technique to one of the mats in mustard color. I stamped 3 tree branches  from Stampin Up and leaves from SeeD's and attached with pop dots. I inked some corragated cardboardand wrapped with twine to imitate the design in the top picture of the entrance to Rainbow Trails. Other embellishments are acorn stamp, brads, stickles, and compass stamp and inks.

I finally made a Just a Note- card (TPE86)

I don't do cards to often ,but when I saw the colors at the Pink Elephant challenge this week-I thought I would like to do this one. So here is the card I came up with to use the colors orange and brown.
 I used a scrap piece of designer paper from Once upon a time -DCWV -sanded it and embossed some butterflies in black powder  added some orange and red stickles to the wings then added 3 little black dots scattered over the front. I mounted that on top of a brick colored cardstock also sanded then glued that to a dark brown cardstock. Tied on a brown ribbon and stamped the saying just a note in black ink. I also did the inside of the card with same papers and techniques. Now I can't wait to send this to someone-its not the fall theme , but I love the colors. To check out this site just click on "the Pink Elephant challenge" above which is underlined.


Here is a picture of the inside of the card.

Reno-

This is for the challenge at Sketches in Thyme #19 this week , which is a few pictures of downtown Reno when we flew into Reno -then rented a car to drive to Lake Tahoe for a week back in 2002. Well we did stay a night and gambled at bit. I used Fancy Papers, mustard and lt. blue cardstock and some misc. scrap papers. Artsy Collage Alphabet tiles for the title which I layered and attached with pop dots, old travel rub-ons that I found in my stash, Jim Holtz distress ink, stardust glitter pens, and a white gel pen.

Friday, October 15

On the Wall-vinyl cut

I took the time to do something for my self this week- and had fun doing some new cuts with vinyl with my Gypsy and Expressions. I thought I'd put a saying on the wall that enters into my craft/scraproom area. "May all who enter as Guests, leave as Friends" So I had this blue marble look contact paper and designed this saying to put there. The wall is also a light blue color, but the picture does not do it well with the bad lighting it looks yellow so you have to believe me as far as the coloring goes. Cartridges used were- for the words Gypsy Font and for the swirls and butterflies Home Accents.
I will be applying this project over at Fantabulous Cricut Challenge Blog #31 for "On the Wall"
Welcome to Frugal Fridays week #24

This week I thought I'd tell ya a little bit about how I remember all the challenges from week to week and what I used for supplies on each of my layouts. I'm not one to remember all the details of my pages let alone remember all the challenges that are offered on a weekly-monthly basis. So I came up with this plan that works for me. Every day/week I make a sketch of the challlenges on a scrap pieces of paper which I have a pile of them by my computer (as seen in the bottom right ), name of challenge and the deadline written on it. Then I got thru my photos and see what works with these challenges or make them work. Then in another notebook (top left) I write down the materials I used for that layout/card/project, and do a little sketch of my layout also when I'm planning it out. Then after I have done the challenge/layout I write it in another book (top right). I put the name of the challenge-date due-name of my layout/project. Then when I have uploaded the photos of the challenges and posted them onto my blogsite ( referring back to my notebook of supplies/materials used)- then I can go enter them into the correct blogsites/ Mr Linky's- once that is all done I highlight them in my book so I know that there are completed and entered into that weekly/monthly challenge. This sounds like alot of work- which it kinda is-but if I didn't write any of this done- it was way way to confusing to try to remember what I did  and when...
    As far as the big black notebook goes- that is where I file and keep all the sketches that I have found in magazines, online- or copied from blogspots. I really like Creative Scrappers sketches and they have a list of them that you can download and copy, which alot of blogs/web sites do. Also my Creative Memories/Paper Crafts magazines have them- so I just cut them out and keep them on file. Or sometimes I see a layout in  magazine or some other inspirational picture and I put that in my big black notebook for future reference. So this is one of my many organization tips for you this week-hope this helps you - and maybe I'll see more of your projects in the upcoming challenges that are offered out there. Happy Scrappin!!!

Thursday, October 14

Lake Tahoe has some very large Pinecones...

Doing this layout brought back so many fun and good memories for me. Back in 2002 my husband and I went to Reno for my Nationals Bowling Tournament for one week- so we took a couple of days and drove down to Lake Tahoe-what a beautiful site this place was. And I couldn't get over how big the trees and pinecones were. I just had to pick up a few and bring them home. I was so excited!!! My husband just laughted at me with all my excitement-he said "It doesn't take much to make you happy".
This take is from Creative Scrappers Sketch number #125, whom are having a bit of a celebration over there with their 125th sketch you should go check them out-they have great sketches every week.Materials used are: My Mind's Eye for background paper, Paper Loft, cardstock and misc papers for color. Coffee bean ink, white gel pen,stickles in Frosted lace and lime green, brown Zig writer, Hero Arts pinecone stamps, and Wild Card Cricut cartridge for all the lettering.

Wednesday, October 13

Practical Scrappers October Sketches

Here are two layouts I did this past week for Practical Scrappers sketch challenge for the month of October. They have 3 really great sketches to choose from and so far I 've done two of them and plan on doing the third one this week if I get the chance.
 I used DCWV-Once upon a Time designer papers(several cuts), silk flowers, embossed swirls in gold powder, pink gemstones and lilac ink. This is my daughters Freshman year school photo. I had to use this paper with the golden locks of hair-it matches my daughters strawberry blonde hair so well.

       This next sketch is my step-daughter in law's bridal shower opening some of the gifts that I gave her. I used K&Company designer paper and pink patterned paper from DCWV for my journaling strips. I drew swirls and topped them with pink stickles, stamped 2 different butterflies and colored them with markers/colored pencils and Sticklesand used pop dots for dimension.
